Hunter SRC Plus Troubleshooting: Fix Common Irrigation Issues
Struggling with your Hunter SRC Plus irrigation controller? You’re not alone. This reliable device can sometimes encounter issues that leave your lawn looking less than lush. Whether it’s erratic watering schedules, display problems, or sensor malfunctions, these hiccups can be frustrating.
Don’t worry, though—most of these issues have straightforward fixes. In this guide, you’ll learn how to troubleshoot common problems with your Hunter SRC Plus, ensuring your irrigation system runs smoothly and your world stays vibrant. Let’s jump into the solutions that will get your controller back on track.
Key Takeaways
- Understanding Common Issues: Recognize that erratic watering schedules, display malfunctions, and sensor problems are common with Hunter SRC Plus controllers.
- Basic Troubleshooting Steps: Key troubleshooting steps include checking the power supply, inspecting wiring connections, resetting the controller, and reviewing program settings.
- Importance of Regular Maintenance: Regular maintenance such as cleaning the control panel, inspecting valves for leaks, and testing sensors is crucial for the controller’s longevity.
- Advanced Troubleshooting: Employing diagnostic tools and performing firmware updates can effectively address more persistent issues.
- Preventive Measures: Implementing preventive maintenance like seasonal adjustments, regular visual inspections, and documentation can help avert potential issues and extend the system’s life.
Overview of Hunter SRC Plus
The Hunter SRC Plus irrigation controller is a widely used device designed to manage water distribution for lawns and gardens efficiently. This section breaks down its key components, functionality, and common user interactions.

Key Components
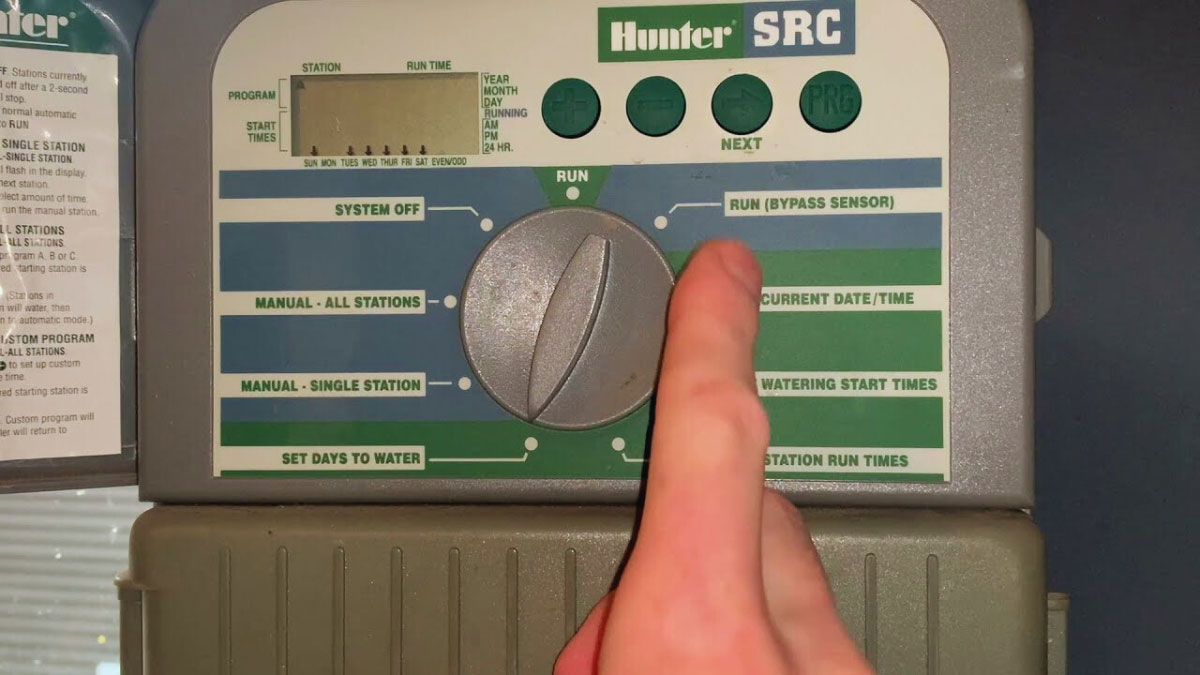
- Control Panel: User interface with buttons and a display screen. It allows programming and manual operation.
- Display Screen: Shows current settings, time, and any system alerts. Ensures visibility of the system’s status.
- Valves: Mechanisms controlling water flow to different zones. Connected to the controller to automate watering.
- Sensors: Devices that detect environmental conditions. Includes rain sensors to prevent unnecessary watering.
Features
- Program Flexibility: Allows multiple start times and watering days. Supports various scheduling needs.
- Seasonal Adjustments: Adjusts watering duration based on seasonal changes. Ensures optimal water usage.
- Non-Volatile Memory: Retains programmed settings during power outages. Prevents data loss.
- Rain Delay: Suspends watering based on recent rainfall. Conserves water.
Setup Process
- Mount the Controller: Install it in a protected outdoor or indoor location.
- Connect the Valves: Attach valves to the specific zone terminals on the controller.
- Install Sensors: Plug in any environmental sensors.
- Program Schedule: Use the control panel to set watering times and days.
- Test the System: Run a manual test to ensure all zones receive water.
Troubleshooting Common Issues
When experiencing issues such as erratic watering schedules or display malfunctions, consider these steps:
- Check Power Supply: Ensure the controller is connected and receiving power.
- Inspect Connections: Verify all wire connections to valves and sensors are secure.
- Reset Controller: If problems persist, perform a factory reset to clear any erroneous settings.
- Review Program Settings: Ensure schedules are correctly programmed without conflicts.
- Replace Faulty Components: Swap out malfunctioning valves or sensors if necessary.
| Component | Average Lifespan | Maintenance Tips |
|---|---|---|
| Control Panel | 7-10 years | Keep dry and clean regularly. |
| Display Screen | 7-10 years | Avoid prolonged exposure to sunlight. |
| Valves | 5-7 years | Inspect for leaks and debris regularly. |
| Sensors | 3-5 years | Test functionality; replace if unresponsive. |
Ensuring regular maintenance and prompt troubleshooting can extend the lifespan of your Hunter SRC Plus irrigation controller, keeping your lawn thriving.
By understanding these features and common issues, you’re better prepared to maintain and troubleshoot your Hunter SRC Plus, ensuring efficient water management.
Common Issues with Hunter SRC Plus
Encountering problems with your Hunter SRC Plus irrigation controller can be frustrating. Here, we’ll investigate into some common issues and provide practical solutions to help you troubleshoot effectively.
Programming Errors
Incorrect programming can lead to erratic watering schedules. These errors often involve wrong start times or runtime durations.
Common Programming Issues:
- Incorrect Time/Date Settings: Ensure the current date and time are accurate.
- Improper Start Times: Verify the start times for each program. Overlapping times cause conflict.
- Mismatched Zone Durations: Check that each zone’s watering duration matches your lawn’s needs.
Steps to Resolve Programming Errors:
- Access the control panel.
- Review current settings for accuracy.
- Adjust start times and durations as needed.
- Save and test the new program.
Wiring Problems
Wiring issues often occur due to loose connections or damaged wires. Faulty wiring can disrupt communication between the controller and valves.
Identification and Resolution:
- Loose Connections: Inspect all wires to ensure they’re secure.
- Damaged Wires: Look for signs of wear or damage and replace if necessary.
- Incorrect Wiring: Ensure each wire connects to the proper terminal as per the installation guide.
Tips for Maintaining Wiring:
- Periodically check wire integrity.
- Protect wires from exposure to harsh elements.
- Use wire connectors for secure connections.
Sensor Malfunctions
Sensors like rain sensors inform the controller when to pause watering. Malfunctions can lead to over or under-watering.
Common Sensor Issues:
- Faulty Rain Sensor: Test the sensor by triggering it manually. If it doesn’t respond, it may require replacement.
- Improper Sensor Installation: Ensure the sensor is installed in an open area, free from obstructions.
Fixing Sensor Malfunctions:
- Check the sensor for any debris or blockages.
- Test the sensor’s functionality manually.
- Replace the sensor if it’s unresponsive.
- Clean sensors regularly to prevent debris build-up.
- Confirm the sensor’s positioning to ensure accurate readings.
Ensuring your Hunter SRC Plus operates efficiently involves regular inspections and maintenance. By addressing programming errors, wiring problems, and sensor malfunctions promptly, you maintain a healthy and vibrant lawn.
Step-by-Step Troubleshooting Guide
Ensuring your Hunter SRC Plus irrigation controller operates smoothly requires systematic troubleshooting. Follow this step-by-step guide to identify and fix common issues.
Checking Power Supply
Confirm power is reaching your controller. If not, address this fundamental issue first:
- Check Circuit Breaker: Ensure the circuit breaker hasn’t tripped. Reset if necessary.
- Inspect Power Cord: Look for any visible damage on the power cord. Replace if frayed or broken.
- Test Outlet: Plug another device into the outlet. If it doesn’t work, you may need an electrician.
Verifying Wiring Connections
Loose or damaged wires can disrupt the controller’s functions. Follow these steps to verify wiring connections:
- Turn Off Power: Always power down before checking wiring.
- Open Controller Panel: Locate and carefully open the panel.
- Inspect Connections: Ensure all wire nuts are tightly secured. Look for signs of corrosion or burn marks.
- Reattach Loose Wires: Tighten any loose connections, and use wire nuts to secure them.
- Check for Damage: Replace any damaged wires with new ones.
Inspecting and Testing Sensors
Sensors play a crucial role in efficient water management. Use this method to identify and resolve sensor issues:
- Identify Sensor Types: Determine which sensors are in use (e.g., rain sensors, soil moisture sensors).
- Visual Inspection: Check for physical damage or debris obstructing sensors.
- Test Sensors: For rain sensors, activate the manual test button. For soil moisture sensors, ensure they read soil conditions accurately.
- Replace Faulty Sensors: Install new sensors if testing reveals malfunctions.
| Sensor Type | Inspection Steps | Testing Method | Replacement Indicator |
|---|---|---|---|
| Rain Sensor | Check for debris or physical damage | Activate manual test button | Malfunction during test |
| Soil Moisture Sensor | Ensure clean and correctly placed | Verify soil condition readings | Incorrect or no reading |
Reprogramming the Controller
Incorrect programming can lead to erratic watering schedules. Follow these steps to reprogram efficiently:
- Factory Reset: Start with a clean slate by restoring factory settings.
- Set Current Date/Time: Ensure the controller displays the correct date and time.
- Program Start Times: Define specific start times for each watering zone. Avoid overlapping times.
- Assign Run Times: Allocate appropriate run times to each zone, based on plant needs.
- Save Settings: Confirm and save your new settings.
Use this guide to troubleshoot your Hunter SRC Plus, ensuring your irrigation system maintains optimal performance.
Advanced Troubleshooting Techniques
Addressing advanced issues with your Hunter SRC Plus irrigation controller ensures efficient water management and a healthy lawn. Jump into these specialized techniques to solve persistent problems.
Using Diagnostic Tools
Use diagnostic tools to identify and resolve issues quickly.
- Multimeter: Measure voltage across connections to detect faulty wiring.
- Cable Tracker: Trace wires to find disconnections or short circuits.
- Testing Sensor: Use an ohmmeter to verify sensor functionality, ensuring accurate readings.
- Controller Diagnostics Mode: Access and interpret error codes from the controller to pinpoint specific issues.
Firmware Updates and Resets
Keep your controller up-to-date and address persistent problems with firmware updates and resets.
- Check for Updates: Visit the Hunter Industries website for the latest firmware. Ensure your controller model is supported.
- Download Firmware: Follow instructions to download the firmware onto a USB drive.
- Install Update: Insert the USB drive into the controller and follow on-screen prompts to update. Confirm successful installation by checking the firmware version.
- Factory Reset: Restore factory settings to eliminate configuration errors.
- Access Reset Option: Navigate to the settings menu.
- Execute Reset: Select and confirm the reset option. Reprogram your schedules as needed.
These advanced techniques enhance your troubleshooting capability, ensuring your irrigation system remains reliable and effective.
Preventive Maintenance Tips
Preventive maintenance extends the lifespan of your Hunter SRC Plus irrigation controller and ensures optimal performance. Follow these tips for consistent and reliable operation.
Regular Visual Inspections
Conduct regular visual inspections to identify visible wear and tear.
- Check Control Panel: Ensure the control panel is clean and the buttons are functional.
- Inspect Wiring: Look for any loose or damaged wires. Replace any corroded connectors.
- Examine Valves and Sensors: Check for debris and ensure they are tightly connected.
Cleaning Components
Keep components clean to avoid malfunctions.
- Control Panel: Use a soft, dry cloth to remove dust.
- Sensors: Clean rain sensors with a mild detergent and soft brush.
- Valves: Flush valves periodically to remove sediment build-up.
Software and Firmware Updates
Regular updates keep the system running smoothly.
- Check for Updates: Visit the Hunter website to download the latest firmware.
- Perform Updates: Follow the manual for step-by-step instructions on updating firmware.
- Schedule Checks: Set reminders to check for updates every six months.
Battery Replacement
Ensure the battery in the controller is functioning properly.
- Locate Battery Slot: Open the control panel to access the battery compartment.
- Replace Annually: Install a fresh battery at least once a year.
- Test Voltage: Use a multimeter to test battery voltage before replacement.
Seasonal Adjustments
Adjust settings to match seasonal weather changes.
- Program Schedules: Update watering schedules based on current weather patterns.
- Rain Delay Settings: Enable rain delay during rainy seasons to prevent over-watering.
- Freeze Protection: Disable the system or reduce watering during frost to protect plants.
Documentation and Record-Keeping
Maintain records for easy troubleshooting and management.
- Log Maintenance Tasks: Keep a log of all maintenance activities and dates.
- Track Settings: Record current system settings before making changes.
- Store Manuals: Keep user manuals handy for quick reference.
Periodic Testing
Regular testing ensures all components function properly.
- Test Sensors: Verify the operation of rain and soil moisture sensors.
- Run System Check: Perform a full system check to confirm proper operation of all zones.
- Check Water Pressure: Ensure water pressure meets system requirements, typically 40-60 psi.
Maintenance Schedule Table
Keep a schedule to streamline preventive maintenance tasks.
| Task | Frequency | Description |
|---|---|---|
| Visual Inspection | Monthly | Inspect control panel, wiring, valves, sensors for damage. |
| Component Cleaning | Every 3 months | Clean control panel, rain sensors, and flush valves. |
| Firmware Updates | Every 6 months | Check and update system firmware. |
| Battery Replacement | Annually | Replace controller battery and test voltage. |
| Seasonal Adjustments | Seasonally | Adjust watering schedules, enable rain delay, check freeze protection. |
| Documentation | Ongoing | Log maintenance tasks, track settings, store manuals. |
| System Testing | Every 3 months | Test sensors, run a full system check, check water pressure. |
Consistently following these preventive maintenance tips can help ensure your Hunter SRC Plus irrigation controller’s longevity and reliability.
Conclusion
Mastering the Hunter SRC Plus irrigation controller ensures your lawn stays lush and healthy. By understanding its key components and features, you can effectively manage your watering schedules. Addressing common issues like erratic schedules, display problems, and sensor malfunctions becomes straightforward with the right troubleshooting steps.
Regular maintenance and timely updates are crucial for optimal performance. Using diagnostic tools and following preventive measures will help extend the life of your controller. Keep your system running smoothly with these tips, and enjoy a vibrant, well-maintained lawn year-round.
Frequently Asked Questions
What is the Hunter SRC Plus irrigation controller?
The Hunter SRC Plus irrigation controller is a device used to manage and automate watering schedules for lawns and gardens. It features program flexibility, non-volatile memory, and rain delay options to enhance water management efficiency.
How do I mount the Hunter SRC Plus controller?
Mounting the Hunter SRC Plus controller involves securing it to a stable surface, connecting the control panel to the valves and sensors, and ensuring a power supply is available. Detailed instructions can be found in the user manual.
Why is my Hunter SRC Plus not following the programmed schedule?
Common causes for erratic schedules include incorrect time/date settings, programming errors, or faulty sensors. Verify all program settings and check sensor functionality to troubleshoot this issue.
How can I reset my Hunter SRC Plus controller?
To reset the Hunter SRC Plus controller, locate the “Reset” button, often found on the back or side of the control panel. Press and hold this button for a few seconds to restore default settings.
What should I do if the display screen is blank?
A blank display screen may indicate a power issue. Ensure the controller is properly connected to a power source and check for any blown fuses. If the problem persists, consult a professional for further assistance.
How do I test the sensors on my Hunter SRC Plus?
Testing sensors typically involves checking connections, inspecting for damages, and using a multimeter to measure sensor output. Refer to the manual for specific instructions on your sensor model.
How often should I perform maintenance on my Hunter SRC Plus?
Regular maintenance should be performed at least once a year. This includes visual inspections, cleaning components, replacing batteries, and updating firmware to ensure optimal performance.
Can faulty wiring affect the Hunter SRC Plus functioning?
Yes, faulty wiring can cause a range of issues, from erratic schedules to complete device failure. Inspect all wires for damages and ensure tight connections to troubleshoot wiring problems.
How do I update the firmware on my Hunter SRC Plus?
Firmware updates can be done by downloading the latest version from the manufacturer’s website and following the provided instructions to install it on your controller.
What are some preventive maintenance tips for the Hunter SRC Plus?
Preventive maintenance includes regular visual inspections, cleaning, annual battery replacement, seasonal watering schedule adjustments, and keeping documentation for troubleshooting. Adhering to these practices enhances the controller’s reliability and longevity.